


02/01
paper-practice2
DevLog 1
// Memory Object Production Pipeline
The structure of the space started out with the wheel-and-spoke-structure of the proposal. My first concern was finding a way establishing a production pipeline for me, to be able to put enough 3D models in the project. Thinking about the rooms and objects to build the memory journeys out of, there would have to be quite some amount of them, and they needed to have certain qualities: Memorable, distinguishable, unique and easily visually readable, to be memorized as easily as possible.
Having only little experience with 3D modelling myself, i knew that making the models myself would be out of scope for this project, so i looked at premade asset packs first. These usually did not fulfill my specifications, most of them are made for video games specifically, and thus the objects within have a very similar theming whereas i was looking for diversity. They mostly visually communicate video game concepts, an item box to break, a weapon to pick up, a spring pad to jump on, things like that, not really useful for me, to potentially confusing for an audience not used to video games.
The next alley i explored was photogrammetry: I knew it had becoming more popular recently, but had not delved into it further previously. If viable, i could even scan objects or environments myself without having to go into manual digital modelling too much.
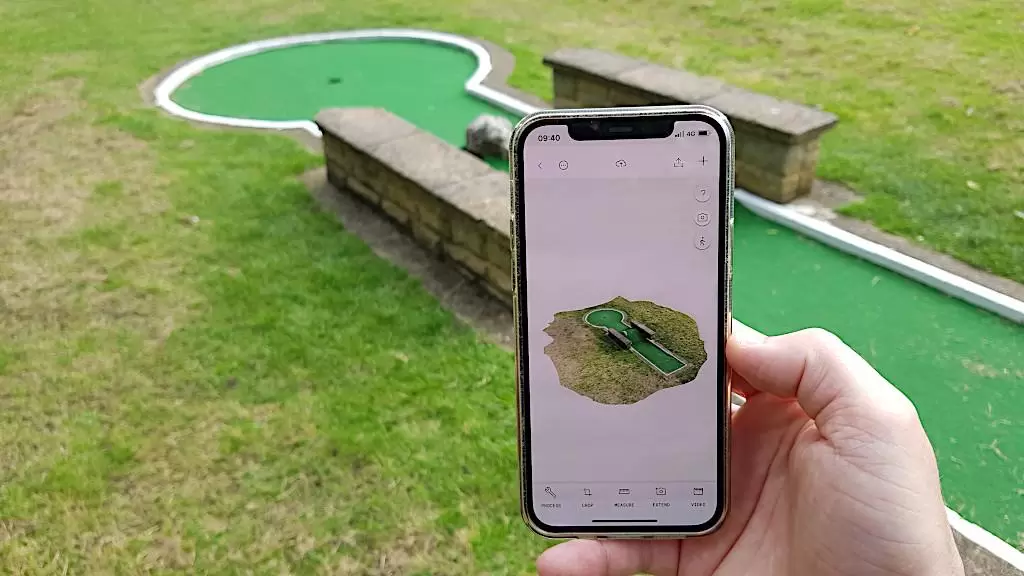
There are many different free and/or open source solutions available, first i tried the popular Meshroom, used by many for drone capture photogrammetry and archeology. For testing, i built a small paper model, with some thin components, different colours and surfaces, to test the programs accuracy and weaknesses. I captured the model with my larger camera, a high quality mirrorless, shooting around 200 pictures from all angles, circling around multiple times. It worked reasonably well out of the box, although it took quite a long time to generate the model, my reasonable powerful pc was running on full load for some two hours. The result was usable, although as i suspected, the thin parts of the object posed some difficulty and made the model overall very jagged and rough looking. In total, this didn’t seem satisfactory yet, too many overall downsides, long render times, unclean results, unnecessarily high poly count and necessary cleanup. I was looking for an easier, more quick-and-dirty, less involved photogrammetry application, and i found one: Polycam.
It is an app for iOs and Android, that allows for super quick and easy capture, the images are sent off for cloud processing and take more in the area of five minutes opposed to two hours. While the results are not nearly as detailed as the ones coming out of meshroom (i.e. people working with drones, archeology, vfx for movies or architecture would need this kind of accuracy), this was perfect for my use case.
The same paper model came out way cleaner through Polycam, so in the following days, i scanned a variety of objects and environments, mostly for testing purposes in that stage, but with the option to keep the good results and potentially use them later.
There is a relatively cheap premium option for polycam, but i didn’t even need it, since there are so many free scans included in the free plan already, and the only export format offered in free is .glb, which Blender imports without problems. So before importing in Unity, i have to load the models into Blender, extract the materials, reduce the polycount if they are too big, clean up and delete some jagged-looking vertices or other parts I don’t like or need.
Also really great about Polycam: they have built a community and sharing platform, for people using the app regularly, where users can upload, tag, search, share and download their models quickly, easily and license free. This proved to be a valuable resource for models of consistent style and quality. The pool of objects that i moderated to be available inside Mnemo for users to pick from consists of a mixture of three kinds:
Objects with unique recognizability, through either being bizarre (huge bowl of shredded cheese, squirrel sheriff), cute (cat, frog statue), or of a brand name (Nutella Jar, Uno Cards)
Objects that are simple, but allow for clear actions to be attached, like a hammer (hammering), a skateboard (skating), a package (opening).
Objects that are mundane and are often found in everyday life, so there might be a chance of them appearing naturally in memories anyways, like potted plants, a loaf of brad on a cutting board or a suitcase.
// Basic Controls & Room Structure
With the modelling topic more or less solved for now, the next step was setting up the basic movement within the palace. So far i had only implemented the standard Unity VR setup (XR Interaction Toolkit), with only the ability to move around and nothing else.
So the first thing was to make the objects i imported movable, easy enough, since there are presets for grabbable objects with physics available in the XRIT. While it was fun to be able to throw around the objects and push them over, this was not ideal for being able to place them freely later, so i turned off the gravity (turning the objects kinematic). Now they would stay in the air, could be moved inside walls and other objects, making them placeable with greater freedom.
Sticking with the overall room structure of the proposal, the approach for bringing more control to the users regarding palace construction, which room goes where, was to start with an empty world. Instead of rooms, there would be slots for rooms, with a terminal infront from which to cycle through, then pick a room.
Along with this principle of room-picking, i also set up a system, in which every room has ist own skybox, music and post-processing effects (i.e. colour grading, everything applied to the image at the end of each frame). These parameters would then smoothly blend over when entering and exiting the rooms.
// Saving System
While generally relatively confident with my abilities of learning on the fly and pushing the boundaries of my programming skills, at this point i noticed that my overview of Unity and C# was not entirely as complete as i had hoped for. Many things just took more time than i anticipated, from the technical side. Like the save system i tackled next, if i wanted to test with different people and have something usable i would need a way to save people’s palaces, which rooms and objects are where and the general state of progression, for whatever i was going to add in the future.
It does work, but also took quite some time of fiddling, i previously had no experience with systems like this. I had to look into things like serialization, abstract classes and more. I would through the whole time of the thesis regularly come back to make whatever changes i made, compatible with the save system. In Unity, the name of the palace can be chosen in the editor, and when saving the positions, rotations, and scales of all rooms and objects is put into a .json file. Upon loading, a file with the same palace name is searched and loaded, and all positions etc. written back to the respective objects. A nice side effect of that was that it was forcing me to more consequently work with unitys prefabs (kind of like blueprints for objects), which is very necessary in this case.
// Improving the Visuals
At this state, having set up a lot of the basics, next up was building a better look. For some i tried out many different tools, set up different environments for the palace to be in, tried out skyboxes, particle systems, post processing effects, shaders and different approaches for a potential architecture of the central hub island and the surrounding space.
This is where i hit a roadblock. The look was not coming together so far, it looked too much like a random Unity project, too all over the place, not really concise. I would need more art direction.
The first consequence was removing a lot of things and thinking about the visuals completely anew. In the end, the focus should be on the palace and it’s objects, not too much on the further environment. The notion of the palace being a happy place, or a serene, zen-like meditative place had not been questioned so far, and felt like it was holding back the rest of the project. Definitely the right decision, since making spaces super inviting, comfortable and meditative is in itself not trivial and could be a completely different project on its own.
So i removed everything, only the photogrammetry objects and rooms remain suspended in the void. But with this much focus on the palace only, there was something missing. The progression of building the palace by just going around and picking the rooms from the terminals still felt very rigid and not engaging enough. There was no particular reason to pick one room over the other.
// Introducing More Construction Freedom
To break this rigidity up somewhat, i wanted to find a way to actually construct the palace as a user, to place the rooms individually. Making this possible was challenging. After much trying around and thinking about the possibilities, i settled on having what is now called the RoomSpawner. It is an object that can be picked up and placed like all the other ones. Wanting to try out a photogrammetry-only look, it is made from an amalgamate of objects downloaded from polycam, an oscilloscope, a metal box, a leafblower, some salt lamps, all fused together to form one sciency looking device. It has two buttons on the top, one cycles through the rooms that are possible to place, with the room being already displayed at the spot infront of the device where it would go, the other button placing the room permanently.
This also meant having to introduce the “RoomMoveMode”, a mode that can be toggled with a button, that enables and disables the ability to grab and move rooms like an object, during which one cannot teleport-move onto them. These two tools together now enabled a completely free placement and later re-arranging of everything.
While making the placing and building more fun, the players would need some amount of guidance, or a goal, i suspected otherwise it would be rather confusing, being given the power to place and shift things, without any kind of sense which structure makes sense, how to go about it.
Although later in the process i will also add a in-app tutorial, at this point, the idea i was working with was that the entire method would be conducted by a therapist or other kind of facilitator. Which of course would allow for the users to get continuous help and input on how to construct the palace. But nonetheless i wanted to have the palace construction be somewhat guided at least.
Where previously were the premade spots for the rooms to be in, were now inbetween-resting platforms instead. Previously the idea for the objects would have been to have them all in one central hub to carry them to the rooms, but with this setup, i split them between these resting platforms, reducing the walking distances. Before going into the first round of testing, i also set up a very bare-bones short tutorial. The players would start on the floor grid infront of a set of stairs, with some floating text explaining the most basic controls and an object on the stairs with more text explaining grabbing/moving. The stairs lead to the hub, a circular room from the Polycam explore page, an arrangement of stone walls in a park. There the user would find the RoomSpawner and some objects, with some further small explanation texts. This tutorial was not meant to explain everything on its own, but act as an additional reminder for the explanations the user would receive from me.
Having done a lot in Unity already, there was no concise look yet, but it was high time to also begin the testing. So i prepared everything, to get some new input, some feedback, and then tackle the art direction afterwards.

Rather advanced: Photogrammetry in Meshroom
[I11]

Polycam: Super straight forward
[I12]

Improved paper model scan
Polycam: My Own Scans


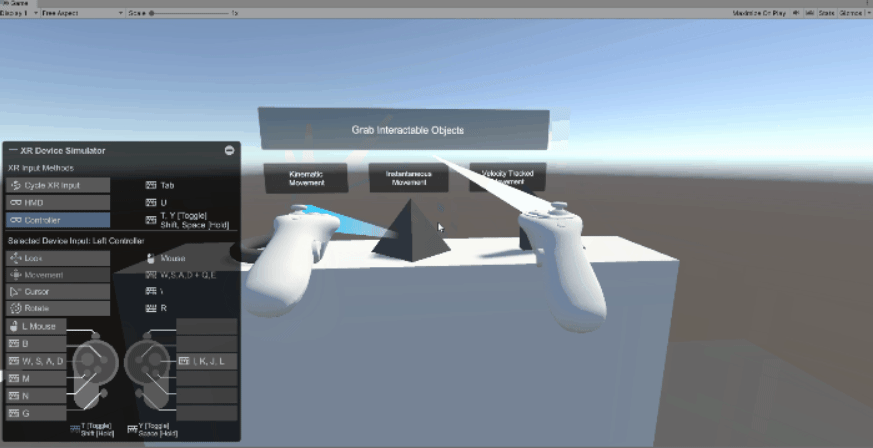

Unity’s XR Interaction Toolkit

Selection of objects from the final prototype version
Save system in editor, around
300 lines of code


Playing around with effects and environments

Back to raw photogrammetry
The RoomSpawn device

In prime colours: The in-between platforms